By default, CCC will copy everything from the volume or folder that you specify as the source. If you do not want to copy every item from the source, you can define a task filter to limit what items will be copied. Choose Copy Some Files from the popup menu underneath the Source selector, then click on the Task Filter button to open the Task Filters panel.
Default Filter Behavior
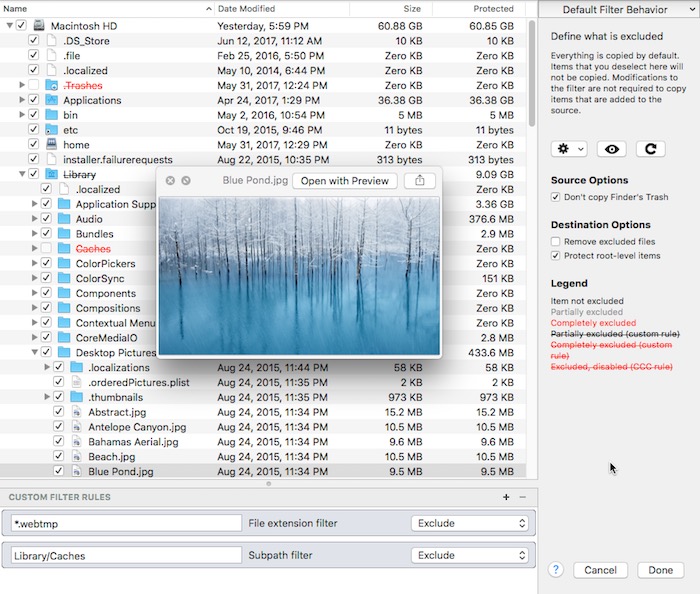
The CCC task filter offers two paradigms for defining the task filter. The task filter can either include everything by default or the filter can exclude everything by default. Which behavior you choose depends on what you want CCC to do with new items that are added to the source.
Include everything by default: Define what is excluded
CCC's default behavior is to include everything by default. In this mode you define what is excluded from the backup task by unchecking the box next to an item in the file list. This mode is simplest for users that only want to exclude a handful of items, but generally back up everything because you don't have to revisit the task filter to indicate that new items should be included in the backup task. If you add a file or folder to the source (e.g. in the future after defining your task filter), and that item is not in a folder that you have excluded from the backup task, that item will automatically be included in the backup task.
Exclude everything by default: Define what is included
In this mode, everything is excluded by default, and you define what is included in the backup task by checking the box next to an item in the file list. If you add an item to the source in the future, and that item is not in a folder that is specifically included by the task filter, that item will not be backed up. This mode is helpful in cases where you only want to back up a handful of items on a volume whose subfolders frequently change.
Calculating disk usage and Protected Size
You can right-click on any folder and choose Refresh size to have CCC enumerate the contents of that folder and evaluate the task filter against its contents. CCC will report the total size of the folder and the protected size of the folder (i.e. how much data is included in the backup task). You can also click on the Refresh Disk Usage button to enumerate the contents of the entire source. This could take a while, especially for network volumes, so consider refreshing the disk usage of individual folders instead. If CCC is in the midst of enumerating a folder, you can right-click on that folder to stop enumeration, or click again on the Refresh Disk Usage button to stop the calculation.
Source and destination options
By default, CCC won't copy the contents of the Finder Trash because, well, it's Trash. If you want CCC to back up your Trash, uncheck the Don't copy Finder's Trash box to remove the exclusion.
Excluded files are not deleted from the destination
When you exclude an item from the CCC backup task, this tells CCC, "Do not copy that item". That does not, however, indicate that CCC should delete that item from the destination, e.g. if it had been copied there by a previous backup task. In fact, excluding an item from the backup task implicitly protects that item on the destination. If you have items on the destination that are now excluded from a backup task that you no longer want to retain on the destination, you can simply remove them from the destination by dragging them to the Trash. If you would like CCC to facilitate that cleanup, check the Remove excluded files checkbox.
This option is ignored if your task is configured with the Don't delete anything SafetyNet setting. This setting also will not override CCC's explicit protections placed on the _CCC SafetyNet folder, so when this option is used in conjunction with CCC's "SafetyNet On" setting, items will be moved to the SafetyNet folder rather than deleted immediately.
Please carefully consider the scope of effect that this option will have when using the Exclude everything by default filter behavior.
The Protect root level items setting is described in more detail in the Advanced Settings article.
Custom Filters
If the files you want to match are scattered across your filesystem, it may be tedious to manually locate each of them and create conventional rules (i.e. check or uncheck the item in the file list). To address this, CCC offers custom filter options in which you define a filter rule using an expression. Choose Show custom filters from the gear menu to reveal the custom filters table.
To add a custom filter rule, click the + button in the custom rules table header, or drag a file or folder from the file list into the custom filters table to add that item as a template. To reorder custom filters, simply drag and drop the items in the custom filters table. Custom filter rules will be evaluated by the task filter before conventional filter rules.
Anchored path filter
An anchored path filter defines a rule using an absolute path relative to the root of the source. /Library/Caches, for example, is an anchored path filter because it starts with a "/". This filter would match /Library/Caches, but would not match /Users/someuser/Library/Caches. You can also include wildcards in the expression, e.g. /Users/*/Library/Caches would match the Library/Caches folder in each user home folder.
Subpath filter
A subpath filter defines a rule using a partial path or filename that does not start with "/". Continuing the example above, Library/Caches would match /Library/Caches and /Users/someuser/Library/Caches. Wildcards are accepted in the expression; to match a particular file type, use an expression like *.mov to match all .mov files.
Wildcard characters
Wildcard characters can be added to an expression to match a wider range of files and folders. * will match one or more characters in any single file or folder name, e.g. *.mov will match all movie files.
/**/ will match one or more path components, e.g. /Users/**/*.jpg will match any JPEG photos in any user home folders, but won't match JPEG photos elsewhere, e.g. those in /Library/Desktop Pictures. You would also use the ** wildcard when defining an inclusion rule that should copy all items within a particular folder and its subfolders. For example, /Users/yourname/Documents would include only that folder itself, not any of its contents. /Users/yourname/Documents/** would include the Documents folder, all of its contents, and the contents of every subfolder within it.
If you specify additional path components after a ** wildcard, then that wildcard is only applicable up to a match against the path component that follows the wildcard. For example, the exclusion rule /Data/**/Marine/Invertebrates would exclude /Data/2018/Marine/Invertebrates, but it would not exclude /Data/2018/Marine/Benthic/Marine/Invertebrates. In the latter case, **/Marine matches 2018/Marine, but then the the next path component fails to match (and we are deliberately choosing to not allow the ** wildcard to match 2018/Marine/Benthic in this case).
? can be used to match any single character, e.g. *.mp? will match both .mp3 and .mp4 files. Use the ? wildcard sparingly, it will greatly increase the amount of time required to evaluate the task filter.
Expert settings
Custom filter rules are usually applied to include or exclude an item. Exclusions, however, are actually composed of two behaviors: a matching item on the source will not be copied (Hide the item from the copier), and a matching item on the destination will be protected (Protect the item from the copier). Likewise, Inclusions indicate that a matching item on the source will be copied (Show the item to the copier) and a matching item on the destination may be deleted (Risk the item). Occasionally it's helpful to define a rule that affects only matching items on the source or only on matching items on the destination. For example, if you have a folder named "Archives" on the destination that does not exist on the source, that item won't appear in the source list so it cannot be excluded (and thus protected) in the conventional manner. You could add an /ArchivesProtect rule to explicitly protect that item on the destination.
Including folders and their content with the 'Exclude everything by default' filter behavior and custom rules
Including a folder or a bundle file and its contents via a custom rule requires a non-intuitive expression, because the filter rule must match multiple path components. To include a folder and all of its contents, add ** to the end of the filter expression. For example, to include the Photos Library from your home directory, the following expression would apply as an inclusion rule:
/Users/johnny/Pictures.Photos Library.photolibrary**
Exporting and Importing filters
A whole task filter can be imported or exported via the gear menu. When importing a filter, the current filter will be replaced with the filter you're importing. CCC will automatically purge conventional rules from the filter if they are not applicable to the currently-selected source. For example, f you had excluded /Applications in the filter, but /Applications does not exist on the current source, that rule will be removed from the filter to avoid unexpected results should an /Applications folder ever be added to the source. This purging is not applicable to custom filter rules.
You can also export individual or groups of custom filter rules. Select the rule(s), then simply drag the items onto your Desktop. To import custom rules from a file exported in this manner, simply drag the file into the custom filter rules table.
Items automatically excluded
Carbon Copy Cloner excludes some items from the backup task by default. A complete list of exclusions along with an explanation for the exclusion is available in this section of the documentation. If you would like to visualize the items that are automatically excluded, hold down the Option key while clicking on the Task Filter button to open the Task Filters window.
The CCC SafetyNet folder, "_CCC SafetyNet" is excluded by a global filter. See the Frequently asked questions about the Carbon Copy Cloner SafetyNet section of the documentation to learn how to restore items from that folder.
Additionally, CCC will exclude and protect system folders if you select the startup disk or a non-HFS+/APFS formatted volume as the destination. If you would like to restore a specific item, such as the contents of /Library/Application Support, this protection can be avoided by choosing a specific folder at the source and destination via the Choose a folder options in the Source and Destination selectors. With great power comes great responsibility — take care to avoid overwriting your system files.


 ) to open the Task Filters panel.